Have you ever wondered how to troubleshoot and fix a faulty exhaust manifold or header? In this article, we will explore the steps you can take to identify and address common issues with your vehicle’s exhaust system. Whether you’re a seasoned car enthusiast or just curious about the inner workings of your car, stay tuned for helpful tips and techniques that will guide you through the process of diagnosing and repairing a problematic exhaust manifold or header.
Common Symptoms of a Faulty Exhaust Manifold or Header
Having a faulty exhaust manifold or header can cause a number of issues with your vehicle. Here are some common symptoms that can indicate a problem:
Excessive Exhaust Noise
If you notice that your vehicle has become louder than usual, particularly when accelerating or idling, it could be a sign of a faulty exhaust manifold or header. This excessive noise is often caused by a leak or crack in the manifold or header, which allows exhaust gases to escape and creates a louder sound.
Decreased Engine Performance
A faulty exhaust manifold or header can also negatively affect the performance of your engine. You may notice a decrease in power, sluggish acceleration, or a reduction in fuel efficiency. This is because a leak or blockage in the exhaust system caused by a faulty manifold or header can disrupt the flow of exhaust gases, leading to reduced engine performance.
Burning Smell
Another symptom of a faulty exhaust manifold or header is a burning smell. This smell can be caused by exhaust gases leaking from cracks or holes in the manifold/header, which can come into contact with other components in the engine bay and produce a distinct burning odor. If you notice this smell, it’s important to address the issue promptly to prevent further damage to your vehicle.
Check Engine Light
A malfunctioning exhaust manifold or header can trigger the check engine light on your vehicle’s dashboard. This warning light is designed to illuminate when the onboard diagnostic system detects a problem with the engine or emissions system. It’s important not to ignore the check engine light, as it can provide valuable information about the health of your vehicle’s exhaust system.
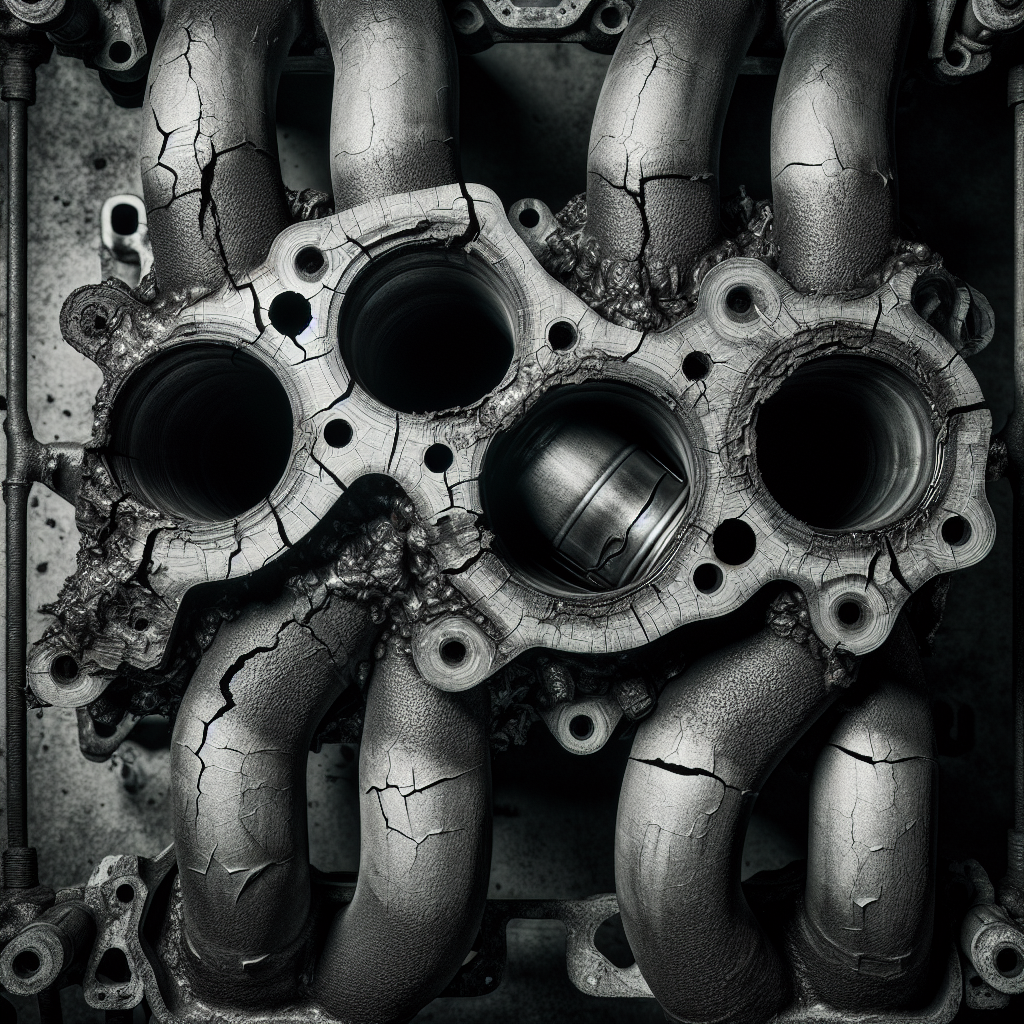
Visible Damage
In some cases, you may be able to visually identify damage to the exhaust manifold or header. This can include cracks, holes, or corrosion on the surface of the component. If you notice any visible damage, it’s a clear indication that there is a problem with your exhaust system that needs to be addressed.
Step-by-Step Guide to Troubleshooting and Fixing a Faulty Exhaust Manifold or Header
If you’re experiencing any of the symptoms mentioned above or suspect that you have a faulty exhaust manifold or header, follow these steps to troubleshoot and fix the issue:
Step 1: Safety Precautions
Before starting any repair work on your vehicle, it’s important to take some safety precautions to protect yourself and prevent any further damage. Here are a few key safety measures to keep in mind:
Wear Protective Gear
When working on your vehicle’s exhaust system, it’s essential to wear the appropriate protective gear. This can include safety goggles, gloves, and a face mask to protect yourself from harmful fumes and any debris that may be released during the repair process.
Ensure Vehicle Stability
Ensure that your vehicle is on a level surface and properly secured before you begin any work. This will prevent it from rolling or shifting unexpectedly, reducing the risk of injury.
Allow the Exhaust System to Cool Down
Before inspecting or repairing the exhaust manifold or header, make sure the engine and exhaust system have cooled down completely. The high temperatures in the exhaust system can cause severe burns, so it’s crucial to wait until everything has cooled off before proceeding.
Step 2: Diagnosing the Issue
The first step in troubleshooting a faulty exhaust manifold or header is to diagnose the problem accurately. Here are a few methods to help you identify the issue:
Perform a Visual Inspection
Inspect the exhaust manifold or header for any visible damage, such as cracks, holes, or signs of corrosion. Examine the connections and gaskets for any leaks or loose fittings. A visual inspection can often provide valuable clues about the source of the problem.
Listen for Unusual Sounds
Start your vehicle and listen for any unusual sounds coming from the exhaust system. Pay attention to any loud hissing, popping, or rattling noises, as these can be indicative of a problem with the manifold or header. Take note of when these noises occur, such as during acceleration or at idle.
Check for Performance Issues
Pay attention to any changes in your vehicle’s performance, such as decreased power, rough idling, or reduced fuel efficiency. These performance issues can often be linked to a faulty exhaust manifold or header. Make a mental note of any specific symptoms you observe to help narrow down the potential problem.
Step 3: Inspecting the Exhaust Manifold or Header
Once you’ve diagnosed the issue, it’s time to inspect the exhaust manifold or header more closely. Here are some key areas to examine:
Visual Inspection of Connections
Inspect the connections between the manifold/header and the rest of the exhaust system. Look for any signs of leaks or loose fittings. Ensure that all bolts and clamps are secure and that there are no visible gaps or breaks in the connections.
Check for Cracks or Holes
Thoroughly examine the surface of the manifold or header for any cracks, holes, or other signs of damage. Pay particular attention to areas where the manifold/header is more prone to stress or heat, such as near the engine block or where the pipes connect.
Examine Gaskets and Seals
Inspect the gaskets and seals between the manifold/header and the engine block and exhaust pipes. Look for any signs of wear or damage, such as disintegration, burning, or compression loss. Damaged gaskets or seals can contribute to leaks and other exhaust system issues.
Step 4: Identifying the Problem
Based on your inspection, you should now have a clearer idea of the specific problem with your exhaust manifold or header. Here are a few potential issues you may have identified:
Exhaust Leak
If you noticed any cracks, holes, or gaps during your inspection, it’s likely that you have an exhaust leak. These leaks can occur due to corrosion, thermal expansion, or other forms of wear and tear. Identifying the location and severity of the leak will help you determine the appropriate repair method.
Broken Studs or Bolts
In some cases, you may find that the studs or bolts that secure the manifold/header to the engine block or exhaust pipes are broken or damaged. This can cause a loose connection or, in more severe cases, the manifold/header may become detached entirely.
Damaged Gaskets or Seals
Worn-out or damaged gaskets and seals can contribute to exhaust leaks. If you noticed any signs of wear or compression loss during your inspection, it’s likely that you will need to replace the gaskets or seals to properly repair the manifold/header.
Cracked or Warped Manifold/Header
Extensive heat or stress can cause the manifold or header to crack or warp over time. If you observed any visible cracks or distortions, it’s important to address these issues promptly, as they can lead to further damage and the need for more extensive repairs.
Step 5: Repairing or Replacing the Exhaust Manifold or Header
Once you have identified the problem, it’s time to repair or replace the faulty manifold or header. Depending on the severity of the issue and your level of expertise, you may choose to tackle the repair yourself or take your vehicle to a professional mechanic. Here are some common repair methods:
Repairing Small Cracks or Holes
If you have identified small cracks or holes in the manifold/header, they may be repairable using an exhaust sealant. Follow the manufacturer’s instructions to apply the sealant and allow it to cure properly before starting the engine.
Replacing Gaskets and Seals
If your inspection revealed damaged gaskets or seals, it’s important to replace them to create a proper seal and prevent future leaks. Remove the old gaskets and seals, clean the surfaces thoroughly, and install new ones according to the manufacturer’s instructions.
Replacing Broken Studs or Bolts
If you discovered any broken or damaged studs or bolts, they will need to be replaced. Remove the old fasteners using appropriate tools such as a socket wrench or pliers, and install new ones with the correct torque specifications.
Replacing the Manifold or Header
In some cases, the damage to the manifold or header may be severe enough that repair is not feasible. If this is the case, you will need to replace the entire component. Follow the manufacturer’s instructions for removal and installation, ensuring a proper fit and alignment.
Common Tools and Supplies Needed
To successfully troubleshoot and fix a faulty exhaust manifold or header, you will need a few tools and supplies. Here are some common ones that may be required for the repair:
- Socket Wrench Set: To remove and install bolts and fasteners.
- Torque Wrench: To tighten the bolts and studs to the correct torque specifications.
- Exhaust Sealant: To repair small cracks or holes in the manifold or header.
- Gasket Set: To replace damaged gaskets and seals.
- Replacement Studs or Bolts: To replace any broken or damaged fasteners.
Ensure that you have the necessary tools and supplies before proceeding with the repair to avoid any delays or complications.
Preventive Maintenance and Care Tips
To prevent future issues with your exhaust manifold or header, it’s important to follow these preventive maintenance and care tips:
Regular Inspection
Regularly inspect your exhaust manifold or header for any signs of damage or leaks. Check the connections, gaskets, and seals for wear and tear. Early detection of issues can prevent further damage and costly repairs.
Using High-Quality Exhaust Components
When replacing or repairing your exhaust manifold or header, invest in high-quality components that are built to last. Cheap or low-quality parts may wear out more quickly and lead to recurring issues.
Proper Torquing of Fasteners
When installing bolts and studs, make sure to follow the manufacturer’s torque specifications. Over-tightening or under-tightening can cause problems and may lead to leaks or engine damage.
Avoiding Extreme Temperatures
Exposing your vehicle’s exhaust system to extreme temperatures, such as driving through deep snow or water, can cause rapid temperature changes and potentially damage the manifold or header. Be mindful of the conditions you drive in and take appropriate precautions.
Avoiding Off-Road Driving
Off-road driving can expose your vehicle’s undercarriage, including the exhaust system, to rough terrain and potential damage. If possible, avoid excessive off-road driving or take measures to protect your exhaust components.
By following these preventive maintenance tips, you can prolong the lifespan of your exhaust manifold or header and minimize the chances of encountering issues in the future.
Conclusion
Troubleshooting and fixing a faulty exhaust manifold or header requires careful inspection, accurate diagnosis, and the appropriate tools and supplies. By familiarizing yourself with the common symptoms and following the step-by-step guide outlined in this article, you can effectively address any issues with your vehicle’s exhaust system. Remember to prioritize safety, consider seeking professional assistance if needed, and prioritize preventive maintenance to prevent future problems. With proper care and attention, your exhaust manifold or header can continue to function optimally, ensuring a smooth and efficient driving experience.


